


 Photography Notebook:
Metering Mode
Photography Notebook:
Metering Mode
Whenever you take a photo, the camera's programming measures the scene's light values and uses an algorithm to interpret the light on the camera's sensor. How this interpretation is done depends on all the camera's settings, including the metering mode set for the camera. The metering mode sets a pattern for how different areas of the scene are exposed in making a photo. In the Rebel, you can choose from among four metering modes--evaluative, partial, spot, and center-weighted average. You can choose from among these modes in the Av, Tv, P, or M shooting modes. These choices give you a chance to set how the camera interprets a scene's light values for different areas of the photo. The metering mode is something that you might not be adjusting with each photo, and you could even leave the camera on evaluative metering most of the time, but knowing the choices available might give you a chance to improve the quality of a particular image.
A Tour of Metering Modes
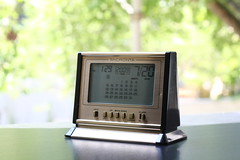
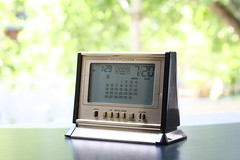
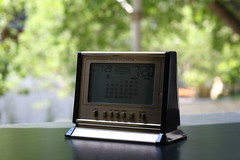
To see the effects of various metering modes, a dramatic way to show the differences among them is to photograph an item with a bright background. I've photographed a desk clock against an open, summery scene out the window to show how the camera makes different adjustments based on the different metering mode settings.
Metering Mode: Evaluative (Pattern or Multi-segment)

Metering Mode: Partial
Metering Mode: Spot
Metering Mode: Center-weighted average
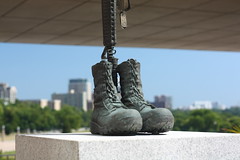
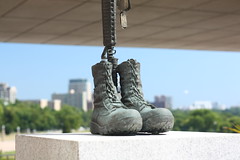
A Field Example of Metering Modes
Seeing the metering modes in a controlled situation is helpful to dramatically show the differences in the modes. But in the field, the effects seem more subtle because there is usually much more complexity to a scene. Here are four photos of a scene which show the Rebel's four metering modes for comparison:
|
Evaluative
|
Partial
|
|
Spot
|
Center-weighted average
|

Example Uses
|
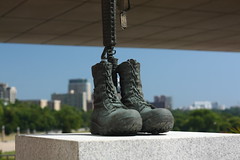
Spot
Spot metering mode exposes the face of the sculpture, and so it appears with an emphasis like a spotlight.
|
Evaluative
Evaluative metering--with flash turned on--took in the whole scene, included the background, and the flash filled in the flowers.
|
Partial
Partial metering mode captures the flowers against a bright background with detail, and the background goes nearly all-white for dramatic emphasis
|


Summary
Preparing these notes helped me understand:- The metering mode controls how the camera sets the exposure for different areas of the frame.
- The metering modes vary in how they treat all areas of the frame, but the center of the image plays a big role in how the different modes set exposure.
- Evaluative (Multipoint) metering is the default for basic zone settings of the Rebel and stands as a good default setting if you can't figure out if you need the other modes.
- Spot metering seems to be a good option if you have a subject that takes up a small area of the scene and is strongly contrasted by its background.
- Partial metering seems to be a good option if you have a subject that takes up a bit more of a scene than in spot metering, but also has a contrasting background.
- Center-weighted metering looks at the overall scene, but gives stronger weight to the subject in the center and thus seems to work well when a central subject larger than in spot metering or partial metering needs to be brought out of a contrasting-background situation.
Sources Consulted
- Busch, David D. (2007). Digital SLR Cameras & Photography For Dummies. Indianapolis: Wiley.
- "metering-mode." Wikipedia. Wikipedia, 2008. Answers.com 20 Jul. 2009. http://www.answers.com/topic/metering-mode